Refinements are how you will customize the Base Daasity explores and views to your business needs.
Refinements are a feature of Looker that allow you to overwrite and append LookML code without editing the original code directly. This is useful for customizing imported files — which power the Hub & Spoke setup — since there is no way to edit them directly.
This article is meant to help you understand the most important aspects of refinements. If there are questions we have not answered here, you may be able to find the answers in Looker's LookML refinements documentation.
How do refinements work?
Refinements are contained in generic .lkml files. They are formatted similarly to normal explore and view files, but with some key differences. When Looker processes a refinement, it meshes the content of the refinement with the contents of the original object that is being refined. In pretty much all cases, the contents of the refinement will take precedence over the contents of the original.
In refinement files, you'll reference a view or explore that already exists in the imported files — the only difference being that you will precede them with a "+". Then you can overwrite existing elements of the original views and explores, or you can add fields and parameters to them.
The diagram below shows a basic example of refining a single field from a Base Daasity view. There are two files: the original order_line_revenue.view.lkml file that is imported from the hub, and the order_line_revenue_refinements.lkml file from the spoke, which contains the refinements. The output section of the diagram shows how the contents of the two files mesh together:
In this example, the refinement file modifies the net_sales measure in two ways: 1. adding a group label and 2. changing which database column is aggregated by the measure.
The net_sales measures in both files include a sql parameter, but with different contents. In situations like this, the contents of the refinement take precedence and overwrite the original value.
There is no group_label defined in the original net_sales measure, but we are defining it in the refinements. So the net_sales output inherits the group_label from the refinement.
Note that we only need to include the parameters in the refinement that we are overwriting or adding. All of the other parameters that we didn't specify in the refinement will just be kept intact from the original object.
Keep reading for more examples for specific use cases.
Creating refinement files
We recommend you keep all of your refinement files within the base_refinements folder.
Refinement files are generic LookML files — not view or explore files. They are the last option in the Add a file or folder menu:
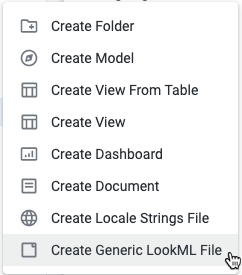
A refinement file always contains at least 2 parts:
At least 1 include parameter
The value of the parameter should be the path of the file that contains the base explore or view that you're refining. Note that if you're referencing a file in the imported base_daasity project, you need to start the path with double-slashes (//)
This makes the contents of the Base Daasity explore or view file available for refinement
At least 1 explore or view parameter
This contains the identifier of the explore or view that you're refining, prefixed with a "+" sign. The "+" sign tells Looker that this is a refinement of an existing object
Your refinements will live within this parameter
If we wanted to create a refinement files for the Base Daasity Marketing Performance explore, the file would need to be set up like this:
include: "//base_daasity/explores/marketing_performance.explore.lkml" # Makes the contents of the marketing_performance explore file available for refining
explore: +marketing_performance { # Identifies the original explore that's being refined, with the "+" prefix
# Refinements go here
}
If we wanted to create a refinement file for the Base Daasity Master Spend view, the file would need to be set up like this:
include: "//base_daasity/views/ums/master_spend.view.lkml" # Makes the contents of the master_spend view file available for refining
view: +master_spend { # Identifies the original view that's being refined, with the "+" prefix
# Refinements go here
}
More refinement examples
Adding a new dimension/measure to an existing view
Daasity out of the box gives you a Cost per Thousand Impressions measure in the Marketing Performance explore that is calculated as ${total_spend} / (1000 * ${total_impresssions}).
But let's say you want to create an additional, slightly different measure that gives you the spend for each impression, called Cost per Impression.
In this example, we're refining the original Base Daasity master_spend view, which is in the following file: //base_daasity/views/ums/master_spend.view.lkml
The contents of the refinement file would look like the following:
/base_refinements/views/ums/master_spend.lkml
include: "//base_daasity/views/ums/master_spend.view.lkml" # ☝Makes the contents of the master_spend view file available for refining
view: +master_spend {
measure: cost_per_impression { # New measure added here & defined below
group_label: "Metrics"
label: "Cost per Impression"
type: number
sql: ${total_spend} / NULLIF(${total_impressions},0)
value_format_name: decimal_4
html: {{ currency_symbol_converted._value }}{{ rendered_value }};;
}
}
Modifying an existing dimension/measure
Let's say you wanted to hide the attribution_window dimension from the master_spend view because your end users don't know enough about attribution windows for them to be relevant.
Here is what the original attribution_window dimension looks in the Base Daasity file:
//base_daasity/views/ums/master_spend.view.lkml
view: master_spend {
label: "Master Spend"
sql_table_name: ums.master_spend ;;
...
dimension: attribution_window {
type: string
description: "Attribution window used to determine vendor-reported orders and revenue"
label: "Attribution Window"
hidden: no
sql: ${TABLE}.attribution_window ;;
}
...
}
The contents of the refinement file would look like the following:
/base_refinements/views/ums/master_spend.lkml
include: "//base_daasity/views/ums/master_spend.view.lkml" # Makes the contents of the master_spend view file available for refining
view: +master_spend { # Identify the view to refine, with a "+" prefix
dimension: attribution_window { # Identify the field to refine
hidden:yes # Add only the parameter(s) you want to override
}
}
In the above code block, you're just using the same dimension identifier as in the Base Daasity view and adding the hidden: yes parameter. Simple as that. You just need to deploy the code, and now this field will be hidden in any explores that contain it.
You only need to include parameters that you want to modify or add. All of the other parameters that are defined for attribution_window in the Base Daasity view will remain intact.
Joining a custom view to an existing Base Daasity explore
In this example, you have created a new, custom view in your custom folder. This new view has date-specific information that you want to join to your Base Daasity order_line_revenue explore. The view name is date_notes and it's in the following file: /custom/date_notes.view.lkml
include: "//base_daasity/explores/order_line_revenue.explore.lkml" # Makes contents of the order_line_evenue explore file available for refining
include: "/custom/date_notes.view.lkml" # Makes contents of the custom date_notes.view.lkml file accessible. This is necessary to join it with the refined explore
explore: +order_line_revenue { # Identify the explore to refine, with a "+" prefix
join: date_notes # Identify the view to join to order_line_revenue
type: left_outer # Define the type of join
relationship: one_to_one # Define the relationship of the join
sql_on: ${retail_calendar.calendar_date} = ${date_notes.date} # Define which fieds to join on
}
Note that even though the order_line_revenue explore joins to a handful of other views, we don't need to include those other joins in the refinement. When you specify a new join in an explore refinement, it adds that join to the other joins already defined in the Base Daasity explore file — it doesn't override the other joins.
Hiding a Base Daasity explore
In this example, you have created a completely custom Order Line Revenue explore in your custom folder and want to hide the Base Daasity Order Line Revenue explore to avoid confusion and ensure end users use the custom version instead.
include: "//base_daasity/explores/order_line_revenue.explore.lkml" # Makes contents of the order_line_evenue explore file available for refining
explore: +order_line_revenue { # Identify the explore to refine, with a "+" prefix
hidden: yes # Adds the hidden: yes parameter to the Base Daasity explore, hiding it from the explore menu
}