# Integration Setup

{% hint style="warning" %}
**You will need Owner Access of your Klaviyo Account to Connect to Daasity**
{% endhint %}

## Step 1: Integrations

<figure><img src="/files/7rGll8vPkGzbulDrBvGb" alt=""><figcaption><p>Click Integrations from Left-Side Menu Bar</p></figcaption></figure>

## Step 2: New Integration

<figure><img src="/files/dMGJycWWrceRnB32uxLZ" alt=""><figcaption><p>Click the New Integration Button on top-right of screen</p></figcaption></figure>

## Step 3: Klaviyo Icon

<figure><img src="/files/QlwWbGqXy3pcwcM1vsUJ" alt=""><figcaption><p>Click the Klaviyo icon from the Integration Page</p></figcaption></figure>

## Step 4: Create A Private API Key

<figure><img src="/files/yACX13MSDOSKGxdDRbJN" alt=""><figcaption><p>Click the Green Link to Create a Private API Key in Klaviyo</p></figcaption></figure>

<figure><img src="/files/ox1CxzCcWUzbcZaKte9T" alt=""><figcaption><p>Log in to Klaviyo</p></figcaption></figure>

<figure><img src="/files/YNdw8tuRjkZmEME3kGcJ" alt=""><figcaption><p>Click the "Create Private API Key" Button</p></figcaption></figure>

<figure><img src="/files/JFf2JaZ5TL7u6sCKTURK" alt=""><figcaption><p>Grant Read-Only Access for every API scope</p></figcaption></figure>

<figure><img src="/files/LYWaC0ZF1m3qkm0YwKYI" alt=""><figcaption><p>Copy Your Private API Key</p></figcaption></figure>

<figure><img src="/files/i9vOAzhyr3qK2NaQ9q7w" alt=""><figcaption><p>Paste Private API Key into Daasity</p></figcaption></figure>

<figure><img src="/files/1pelv4Z0lWEgfNW6MMRE" alt=""><figcaption><p>Click the "Create" button</p></figcaption></figure>

<figure><img src="/files/npyehkbj2j1JN0TvPXIK" alt=""><figcaption><p>Click the "Save" button</p></figcaption></figure>

## Step 5: Link to your Ecommerce Store

<figure><img src="/files/DjgWxeU0942zpwFU6K0h" alt=""><figcaption><p>Click the "Edit" button</p></figcaption></figure>

<figure><img src="/files/vaZiQzXqHjScoQ1T1Mch" alt=""><figcaption><p>Select your Ecommerce Store from the Dropdown Menu</p></figcaption></figure>

## Step 6: Load Historical Data

<figure><img src="/files/nu1jF8o8K1zTfm6oh1w9" alt=""><figcaption><p>Enter the Number of Months You Want to Retrieve Your Data From</p></figcaption></figure>

## How to Give Access to Klaviyo

Only the owner can add new people to manage an account and there can be only one owner per account.

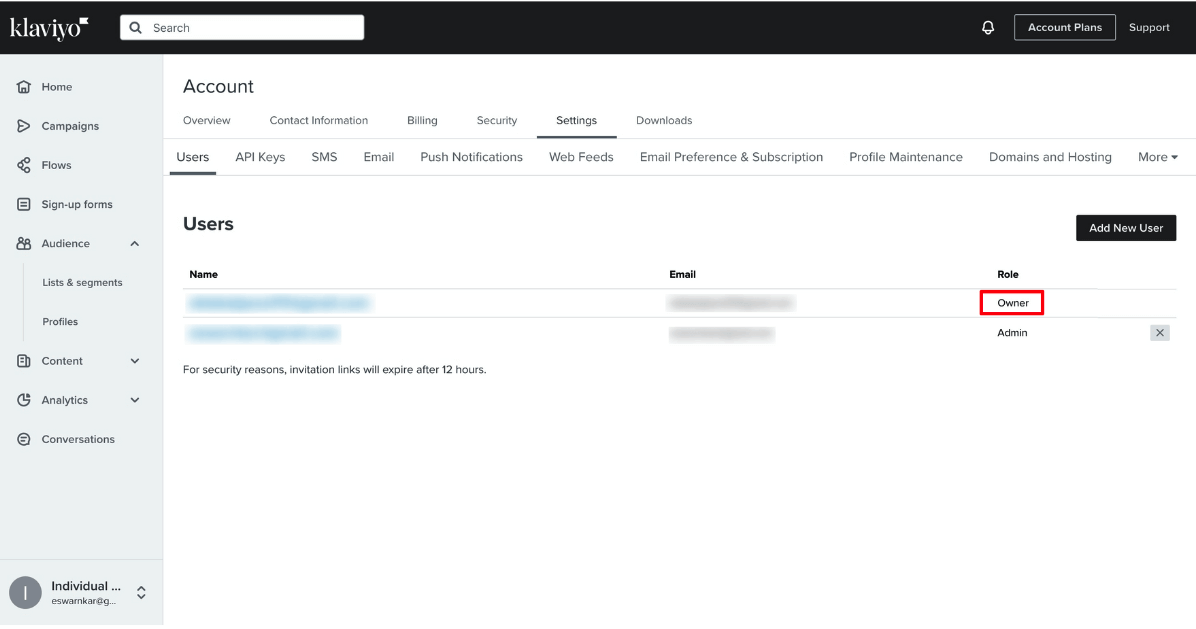
By default, the first person (email address) to create the account is the owner. But if you hired someone to create an account for you, it might be possible you're not the owner. So first, check if you're the owner.&#x20;

If your email address doesn't show "owner," you [need to transfer ownership first.](https://help.klaviyo.com/hc/en-us/articles/360051946112)&#x20;

<figure><img src="https://assets-global.website-files.com/60c334e72012f37063378d4b/642b42d0215a304b9c80963b_checking-account-ownership.png" alt="How to give access to Klaviyo"><figcaption></figcaption></figure>

‍

## Types of User Roles and their Permissions

Once you confirm that you're the owner, decide which type of access you want to give. Different roles have specific permissions to carry out different functions, so determine which type of user role is the right choice.&#x20;

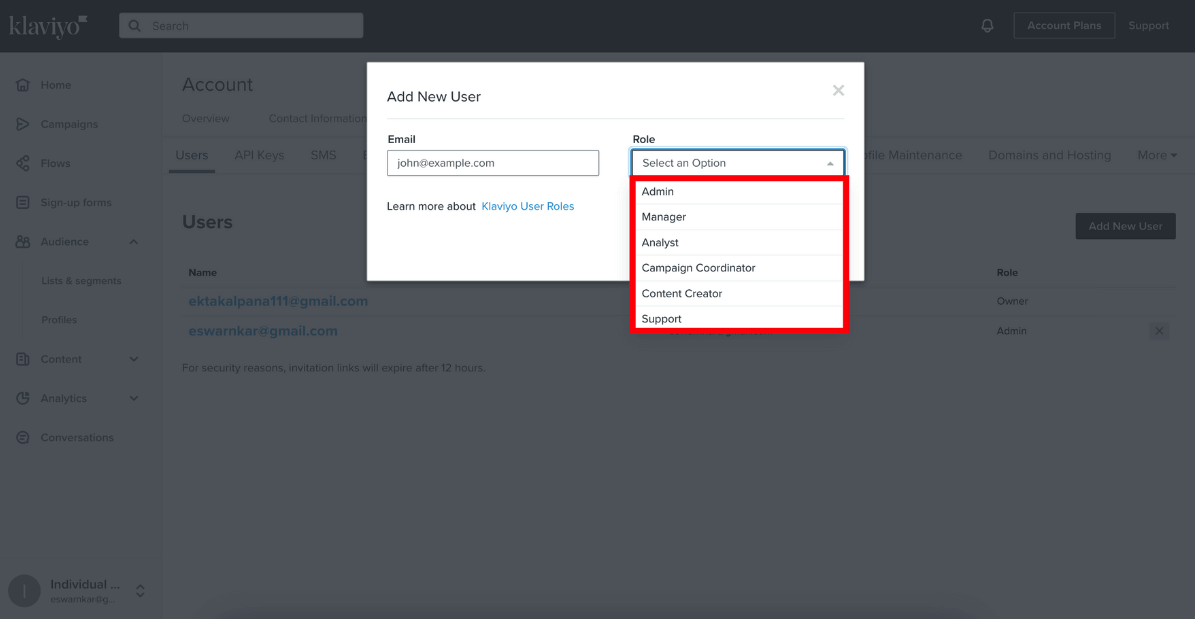
Through your Klaviyo dashboard settings, you can assign six roles:

<figure><img src="https://assets-global.website-files.com/60c334e72012f37063378d4b/642b431af6bc493cdda57432_klaviyo-roles.png" alt="Klaviyo roles"><figcaption></figcaption></figure>

### **Admin**

Admins have full rights similar to the owner. They can manage content, billing subscriptions, create private domain keys, edit Domain authentication pages and account settings.&#x20;

Admins can also view the Klaviyo list, manage API keys (generate private API key), each customer id and data.

However, an admin can't delete an account completely - the only exception is when they show proof that the owner is no longer with the company.&#x20;

### ‍**Manager**

The role of a manager is to ensure the account is running correctly. They generally have access to all features but with limitations in Flow and List management segment, which restricts their access to mailing lists.&#x20;

They can't alter account settings, customer data, API keys, or mailing lists.

### ‍**Analyst**

Analysts work in analytics, segments and reporting sections. Their job is to observe, track and optimize the campaigns' performance.

They will have limited access to all panels: Dashboard, Profile, Analytics, Campaigns, Lists & Segments, Flows and Sign-up forms. But they can't make changes; for example, they can't access the form builder or A/B tester in the Sign-up form.&#x20;

### ‍**Campaign Coordinator**&#x20;

The primary role of a Campaign Coordinator is to ensure the campaigns are sent regularly. They have access to templates they can edit or customize.&#x20;

### ‍**Content Creator**

A content creator is responsible for creating content. They can use templates to create new campaigns; however, they don't have permission to send or schedule them. &#x20;

### ‍**Support**

Support teams generally have access to user profiles (with restrictions) and SMS conversations to help with their queries.

‍

### Adding a User to Klaviyo

After deciding on the user role, follow these steps:

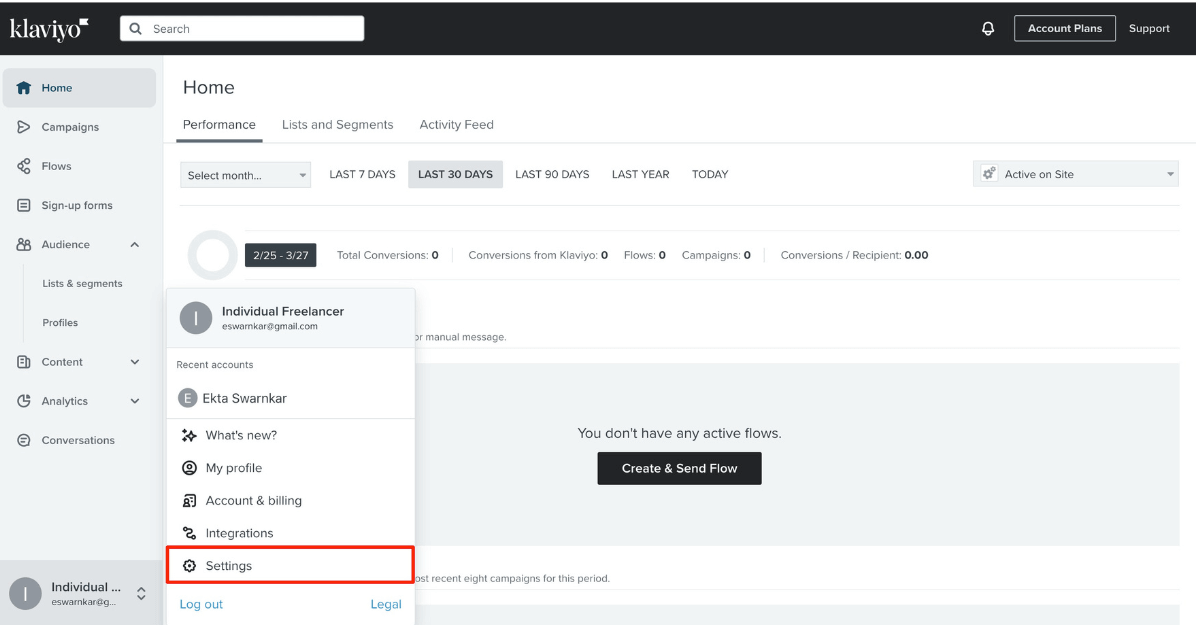
1\. Go to the **"Settings"** section on your Klaviyo dashboard.&#x20;

<figure><img src="https://assets-global.website-files.com/60c334e72012f37063378d4b/642b437ca5d4300037b892ee_setting-on-klaviyo.png" alt="Settings on Klaviyo"><figcaption></figcaption></figure>

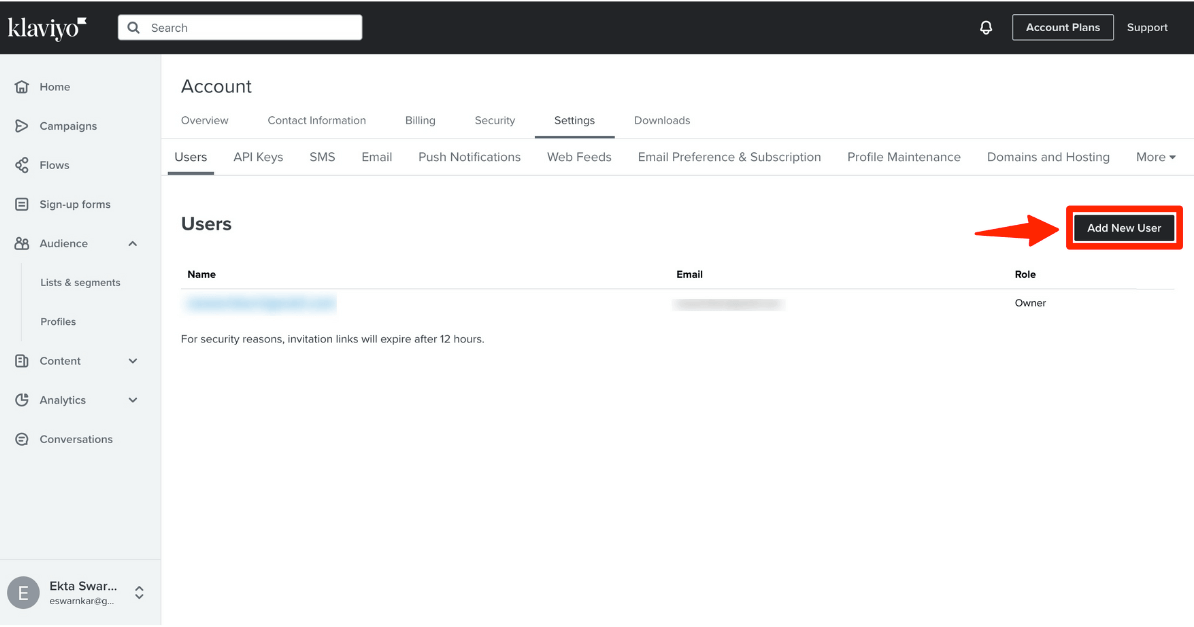
2\. Navigate to the **"Users"** panel and click **"Add New User."**

<figure><img src="https://assets-global.website-files.com/60c334e72012f37063378d4b/642b43d55902ed0bd33ad8f7_adding-a-new-user.png" alt="Add new user Klaviyo"><figcaption></figcaption></figure>

3\. Enter the new user's email address, assign them a User role and click **"Add User."**

<figure><img src="https://assets-global.website-files.com/60c334e72012f37063378d4b/642b4422b1115028055713e3_choosing-and-assigning-a-new-user-role%20(1).png" alt="Assign new user in Klaviyo"><figcaption></figcaption></figure>

Once you complete the steps, an invite link will be sent to their email address.&#x20;

After they accept your account access request, they will be added as a user.  And that's it! Your job is done.


---

# Agent Instructions: Querying This Documentation

If you need additional information that is not directly available in this page, you can query the documentation dynamically by asking a question.

Perform an HTTP GET request on the current page URL with the `ask` query parameter:

```
GET https://help.daasity.com/core-concepts/data-integrations/setup-guides/digital-integrations/deprecated-integrations/klaviyo/integration-setup.md?ask=<question>
```

The question should be specific, self-contained, and written in natural language.
The response will contain a direct answer to the question and relevant excerpts and sources from the documentation.

Use this mechanism when the answer is not explicitly present in the current page, you need clarification or additional context, or you want to retrieve related documentation sections.